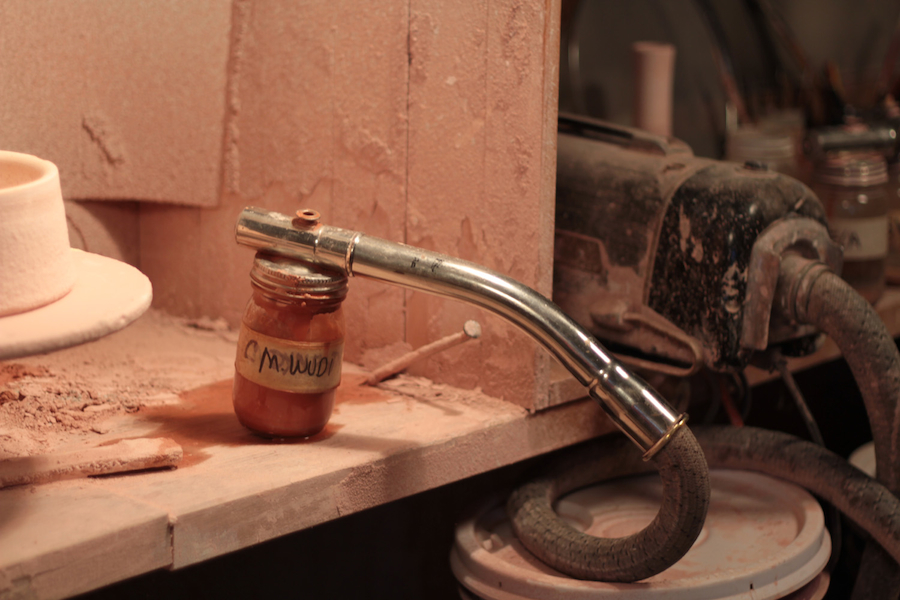
I have been spraying glazes on pots for 45 years, with the same old Electrolux vacuum cleaner. Like some politicians, it sucks and blows all at the same time.
It came with a paint sprayer, which probably worked like a finger on a toothbrush would. I took out the little brass nipple at the end of the spray pipe, and have used it ever since for all of my glazes. The jars size is identical to canning pint jars or mayonnaise jars, and the seals are also available in canning season. I name the jars for their glazes, so as to not contaminate one glaze with another. Junk shops in larger cities have the best selection of these old relics, but I have had good luck at places that do vacuum cleaner repairs too. I bought a lifetime supply from one fellow for $10.00, and he thought I was the fool.Obviously, I use the blowing end of the Electrolux for my work, and find that the volume of air is exactly right for my needs. I have made a small glaze booth, and have an external fan that sucks much of the over spray outside. The fan and the vacuum are hooked into a switched duplex outlet, so they both go on at the same time. Because of the low pressures made by the vacuum cleaner, there is really not very much in the way of over spray, but I do wear a good dust mask at all times when glazing this way. One of the big advantages of the vacuum cleaner/sprayer is that the glazes do not need to be thinned for spraying. This means I can dip, or pour the glazes as well, and I do. I find pouring the insides of vase forms much better than spraying, and limit the spraying to the outsides of most forms. The glazes for the most part have Specific Gravities around 1.40.
It is still important with porcelain, to make sure that the inside glaze is applied at least a day before anything happens on the outside. Two days is better, but at least one must be taken. It is also not a bad idea, especially on heavily worked surfaces to glaze the inside, and then give the outside a damp sponge job to get rid of any residual dust that will cause pin holing later on. [I am assuming here, that the piece is bisqued.] It is an easy step, and will not change the rate of drying for the last outside spray or dip. If you have spent days carving the surface of your piece, another thirty seconds of sponging only makes sense, and re-firing is a pain.
It is usually much better to spray heavily worked surfaces for me. I find that dipping them usually results in a pinhole or crawl no matter what I have done in terms of cleaning. For reasons that I do not fully understand, spraying almost entirely eliminates any surface screw-ups. Once you get the hang of how much glaze is needed on the surface, you will also find that clean up is easy, and breakage from handling is almost never a problem no matter how fragile the bisqued piece is. To help in discovering just exactly how much glaze should be on the piece, play with some broken tiles…dip some and spray some…scratch through the glaze and see how thick they are…it takes a bit of practice, but then that is what we do isn’t it.


